|
Size: 2584
Comment:
|
← Revision 44 as of 2014-05-28 18:44:44 ⇥
Size: 6348
Comment:
|
| Deletions are marked like this. | Additions are marked like this. |
| Line 1: | Line 1: |
| The main documentation for ''e2refinetorelion3d.py'' can be found [[EMAN2/Programs/e2refinetorelion3d|here]] | Notes: *The main documentation for ''e2refinetorelion3d.py'' can be found [[EMAN2/Programs/e2refinetorelion3d|here]] *This tutorial is designed with the assumption that the user has fully completed an EMAN2 refinement. This program draws from many files in the EMAN2 directory structure and was designed to rely on these files existing. |
| Line 5: | Line 9: |
| === Basic Information === This tutorial is designed with 2 assumptions in mind: |
=== Getting Started === |
| Line 8: | Line 11: |
| *That the user has installed Relion on their local machine. Though we do not run the relion_refine program on a local machine, several scripts from the Relion installation package are used to prepare the EMAN2 data for a Relion run. Relion can be downloaded [[http://www2.mrc-lmb.cam.ac.uk/relion/index.php/Main_Page|here]] *That the user has fully completed an EMAN2 refinement. This program draws from many files in the EMAN2 directory structure and was designed to rely on these files existing. === Tutorial === The first thing to do, assuming you've installed Relion and run an EMAN2 reconstruction is to open up the [[EMAN2/Programs/e2projectmanager|Project Manager]]: |
The first thing to do after you've run an EMAN2 reconstruction is to open up the [[EMAN2/Programs/e2projectmanager|Project Manager]]: |
| Line 21: | Line 19: |
| INSERT IMAGE HERE This opens up three tabs in the viewing window: GUI, Command, and Help. 'GUI' contains the options for ''e2refinetorelion3d.py'', 'Command' is the command that will be executed when the user launches the program, and 'Help' is the help text associated with ''e2refinetorelion3d.py''. Along the right side, you will see 7 option buttons with various shapes. (More information about the project manager can be found [[EMAN2/Programs/e2projectmanager|here]]) The Three buttons that are directly impacted by this program are: {{attachment:PM Wiki Button|Wiki Button}} *The Wiki Button {{attachment:PM Wizard Button|Wizard Button}} *The Wizard Button {{attachment:PM Expert Button|Expert Button}} *The Expert Button |
This opens up three tabs in the viewing window: GUI, Command, and Help. 'GUI' contains the options for ''e2refinetorelion3d.py'', 'Command' is the command that will be executed when the user launches the program, and 'Help' is the help text associated with ''e2refinetorelion3d.py''. Along the right side, you will see 7 option buttons with various shapes. (More information about the project manager can be found [[EMAN2/Programs/e2projectmanager|here]]) The Three buttons that are directly impacted by this program are:<<BR>> *{{attachment:PM Wiki Button.png|Wiki Button}} The Wiki Button. This button will open the wiki page for ''e2refinetorelion3d.py'' *{{attachment:PM Wizard Button.png|Wizard Button}} The Wizard Button. This button will open up a step-by-step wizard for new users. It will lead you through entering the program options one at a time with help information. *{{attachment:PM Expert Button.png|Expert Button}} The Expert Button. This button opens up more options in the GUI that are optional and for more expert users. |
| Line 30: | Line 26: |
| ==== I/O Options ==== ''set_name'': This is the name of the particle set that will be used as input to Relion. By clicking 'Browse', you will open the EMAN2 browser and be able select the set by browsing to it.<<BR>> ''refmap'' : This is the 3D map that will be used as a reference map by Relion. It should have the same dimensions as your particles. Typically you should use an EMAN2 completed reconstruction as input.<<BR>> ''randomizemodel'': This is an option that can be used to |
=== I/O Options === {{attachment:e2refinetorelion3d IO Options.png|I/O Options|width=600}} ''set_name'': This is the name of the particle set that will be used as input to Relion. By clicking 'Browse', you will open the EMAN2 browser and be able select the set by browsing to it.<<BR>> ''refmap'': This is the 3D map that will be used as a reference map by Relion. It should have the same dimensions as your particles. Typically you should use an EMAN2 completed reconstruction as input.<<BR>> ''randomizemodel'': This is an option that can be used to randomize the phases of the initial model to a particular resolution (In Angstroms)<<BR>> ''greyscale'': Is the reference map on greyscale?<<BR>> ''symmgroup'': What symmetry group does the particle belong to? Options are C,D, T, O, and I.<<BR>> ''symmnumber'': What symmetry number does this particle have?<<BR>> Once you have these options entered, you can move further down to the CTF options section. === CTF Options === {{attachment:e2refinetorelion3d CTF Options.png|CTF Options|width=600}} There are three boolean options in this section. Check the ''ctfcorrect'' box if you want Relion to perform CTF correction on the particles. The second box, ''dataphaseflipped'', should be checked if your data has been phase flipped already. The final option, ''ignoretofirstpeak'', should be checked if you want CTF-amplitude correction to be performed from the first peak onward. === Optimisation Options === {{attachment:e2refinetorelion3d Optimisation Options.png|Optimisation Options|width=600}} Two important (and required) options are in this section as well as another optional input. ''lowpass'' is the value to which Relion will lowpass filter the reference map. If set to 0, Relion will perform no lowpass filtering on the reference map. ''particle_mask_diameter'' is the diameter of a soft circular mask that Relion will apply to your particles. If you specify a diameter too large, you will include a lot of noise from outside the particle. If you use a value too small, you run the risk of masking out part of the particle. The final option in this section is the ''solventmask''. If you wish to provide a Spider/mrc map containing a (soft) mask with the same dimensions as the reference(s), and values between 0 and 1, with 1 being 100% protein and 0 being 100% solvent, the reconstructed reference map will be multiplied by this mask. === Sampling Options === {{attachment:e2refinetorelion3d Sampling Options.png|Sampling Options|width=600}} In this section there are four options. These options represent the initial values for these parameters and they will be auto-incremented by Relion as the map converges. ''healpix'' is the angular sampling value whereas ''auto_healpix'' is the local search value from auto-sampling. The ''offsetrange'' is the value at which probabilities will be calculated only for translations in a circle with this radius (in pixels). The center of this circle changes at every iteration and is placed at the optimal translation for each image in the previous iteration. Finally, the ''offsetstep'' is the value for which translations will be sampled with this step-size (in pixels). === Run Options === {{attachment:e2refinetorelion3d Run Options.png|Run Options|width=600}} There are only two options in this section. The first is the number of ''threads'' that you wish Relion to use. The second is the maximum amount of memory (''maxmemory'') that each '''thread''' will use when it is initiated. === Expert Options === {{attachment:e2refinetorelion3d Expert Options.png|Expert Options|width=600}} This section has options that are only useful in certain circumstances. Sometimes they can be used to improve reconstructions, but only by users that fully understand what they are doing. The ''amplitudecontrast'' option allows the user to specify the amplitude contrast of the micrographs. The ''intensitycorrection'' option can be checked if you wish to perform intensity-scale correction on image groups. ''print_symmetry'' will print all of the symmetry transformation matrices and exit. If you wish to have Relion perform nearest-neighbor instead of linear Fourier-space interpolation, check the box next to ''nearest_neighbor.'' |
Notes:
The main documentation for e2refinetorelion3d.py can be found here
- This tutorial is designed with the assumption that the user has fully completed an EMAN2 refinement. This program draws from many files in the EMAN2 directory structure and was designed to rely on these files existing.
e2refinetorelion3d Tutorial
Getting Started
The first thing to do after you've run an EMAN2 reconstruction is to open up the Project Manager:
e2projectmanager.py
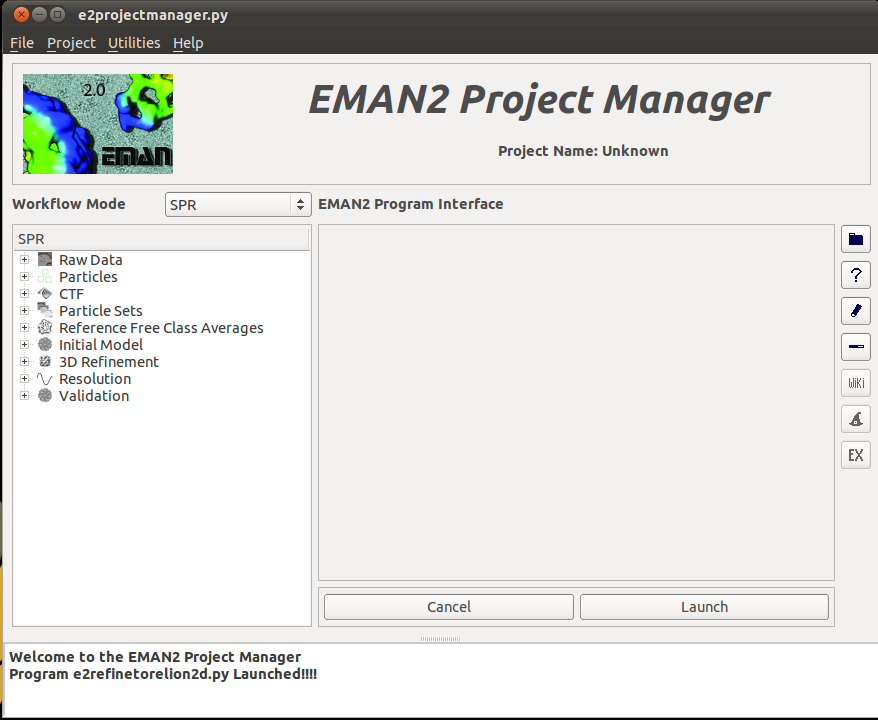
Once you open up the project manager, select the plus (+) next to the 3D refinement tab and you will see several new options appear. The option we want to select is the "Relion 3D Refinement" option.
This opens up three tabs in the viewing window: GUI, Command, and Help. 'GUI' contains the options for e2refinetorelion3d.py, 'Command' is the command that will be executed when the user launches the program, and 'Help' is the help text associated with e2refinetorelion3d.py. Along the right side, you will see 7 option buttons with various shapes. (More information about the project manager can be found here) The Three buttons that are directly impacted by this program are:
 The Wiki Button. This button will open the wiki page for e2refinetorelion3d.py
  The Wizard Button. This button will open up a step-by-step wizard for new users. It will lead you through entering the program options one at a time with help information.
  The Expert Button. This button opens up more options in the GUI that are optional and for more expert users.
In the 'GUI' window, there are several sections of options. The first set options you will see are the I/O options.
I/O Options
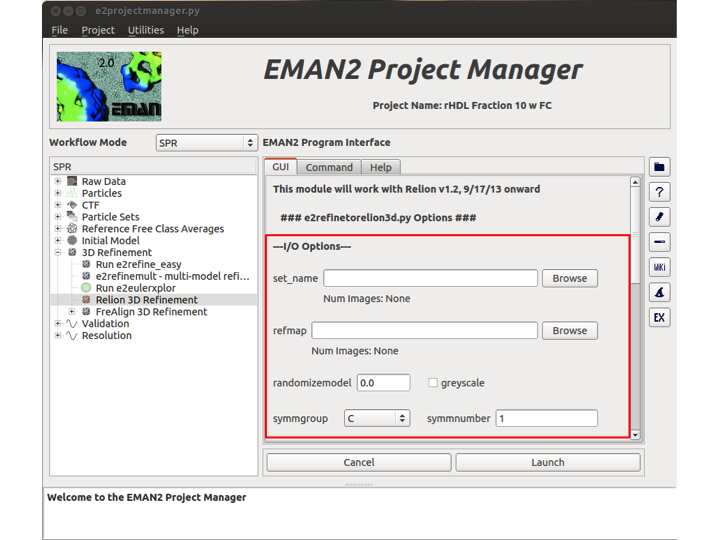
set_name: This is the name of the particle set that will be used as input to Relion. By clicking 'Browse', you will open the EMAN2 browser and be able select the set by browsing to it.
refmap: This is the 3D map that will be used as a reference map by Relion. It should have the same dimensions as your particles. Typically you should use an EMAN2 completed reconstruction as input.
randomizemodel: This is an option that can be used to randomize the phases of the initial model to a particular resolution (In Angstroms)
greyscale: Is the reference map on greyscale?
symmgroup: What symmetry group does the particle belong to? Options are C,D, T, O, and I.
symmnumber: What symmetry number does this particle have?
Once you have these options entered, you can move further down to the CTF options section.
CTF Options
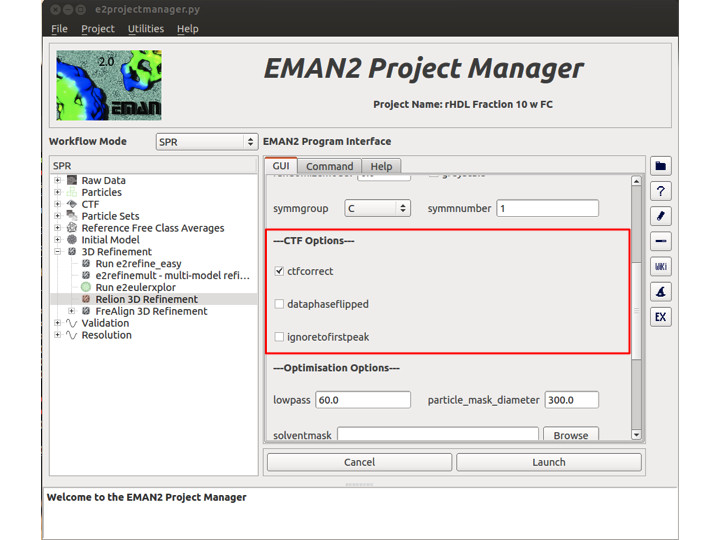
There are three boolean options in this section. Check the ctfcorrect box if you want Relion to perform CTF correction on the particles. The second box, dataphaseflipped, should be checked if your data has been phase flipped already. The final option, ignoretofirstpeak, should be checked if you want CTF-amplitude correction to be performed from the first peak onward.
Optimisation Options
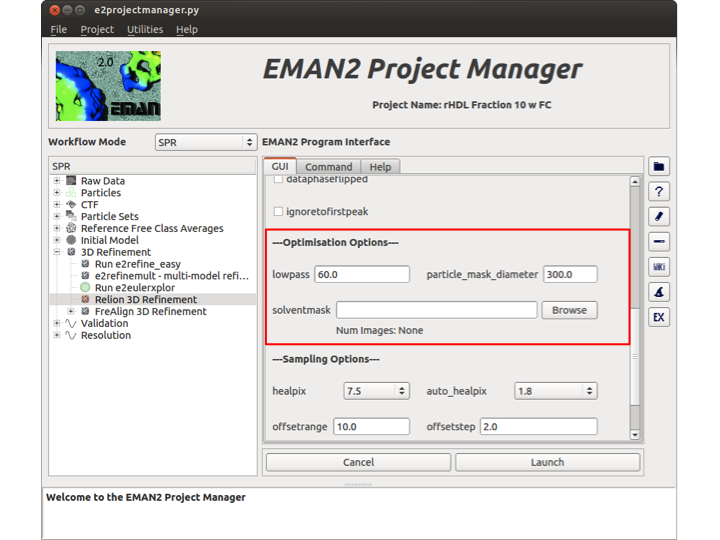
Two important (and required) options are in this section as well as another optional input. lowpass is the value to which Relion will lowpass filter the reference map. If set to 0, Relion will perform no lowpass filtering on the reference map. particle_mask_diameter is the diameter of a soft circular mask that Relion will apply to your particles. If you specify a diameter too large, you will include a lot of noise from outside the particle. If you use a value too small, you run the risk of masking out part of the particle. The final option in this section is the solventmask. If you wish to provide a Spider/mrc map containing a (soft) mask with the same dimensions as the reference(s), and values between 0 and 1, with 1 being 100% protein and 0 being 100% solvent, the reconstructed reference map will be multiplied by this mask.
Sampling Options
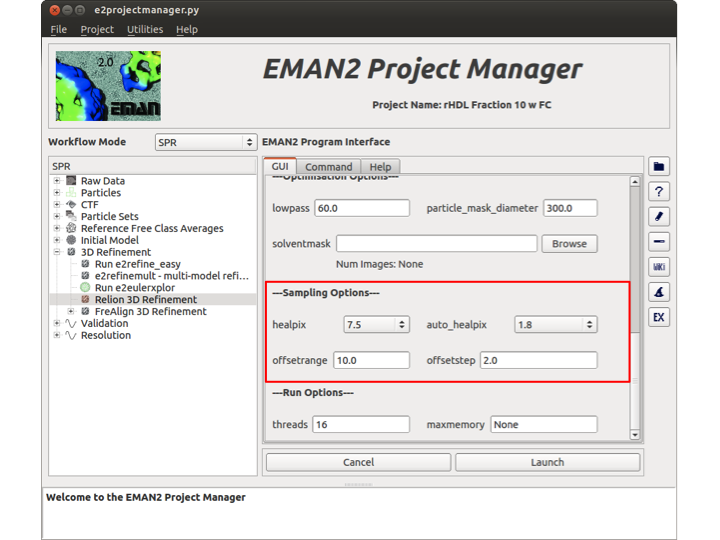
In this section there are four options. These options represent the initial values for these parameters and they will be auto-incremented by Relion as the map converges. healpix is the angular sampling value whereas auto_healpix is the local search value from auto-sampling. The offsetrange is the value at which probabilities will be calculated only for translations in a circle with this radius (in pixels). The center of this circle changes at every iteration and is placed at the optimal translation for each image in the previous iteration. Finally, the offsetstep is the value for which translations will be sampled with this step-size (in pixels).
Run Options
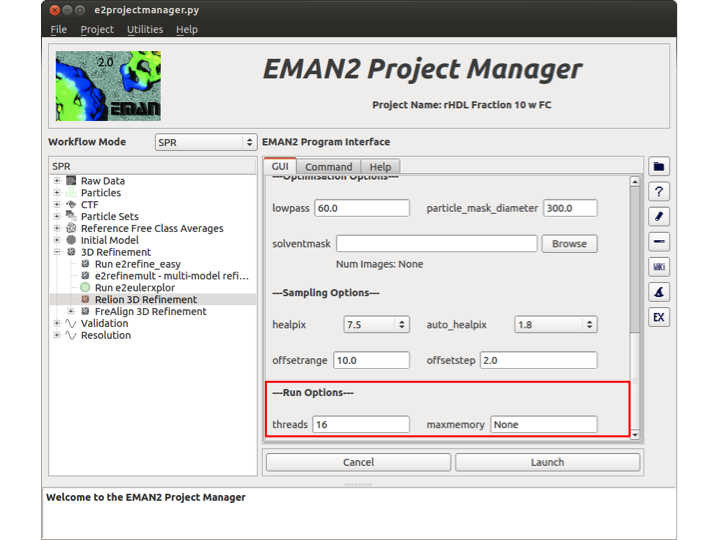
There are only two options in this section. The first is the number of threads that you wish Relion to use. The second is the maximum amount of memory (maxmemory) that each thread will use when it is initiated.
Expert Options
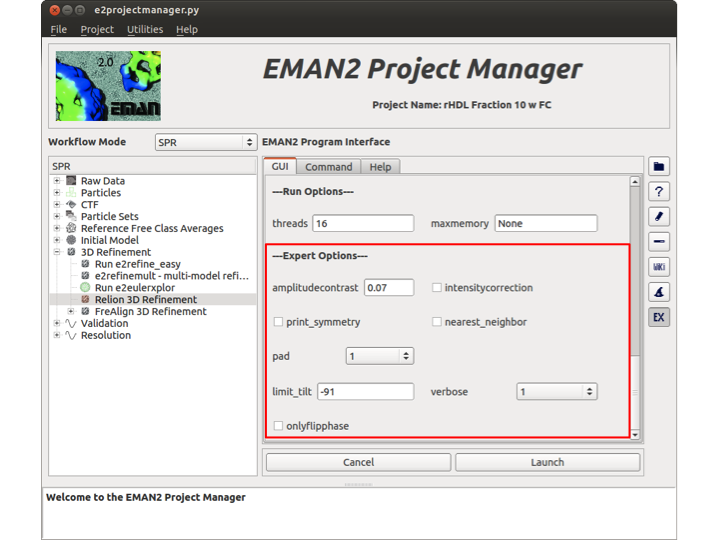
This section has options that are only useful in certain circumstances. Sometimes they can be used to improve reconstructions, but only by users that fully understand what they are doing. The amplitudecontrast option allows the user to specify the amplitude contrast of the micrographs. The intensitycorrection option can be checked if you wish to perform intensity-scale correction on image groups. print_symmetry will print all of the symmetry transformation matrices and exit. If you wish to have Relion perform nearest-neighbor instead of linear Fourier-space interpolation, check the box next to nearest_neighbor.
