Tomogram Segmentation
Availability: EMAN2 daily build after 2016-10
Programs in the tomogram segmentation requires Theano, which is not distributed with EMAN2. To use the protocol, one needs to build EMAN2 from source and install Theano manually.
http://deeplearning.net/software/theano/install.html
Getting Started
First, make an empty directory and get into that directory in command line. Then run e2projectmanager.py from the command line. While a GUI window will show up, it is still a good idea to keep the command line window open to view the messages.
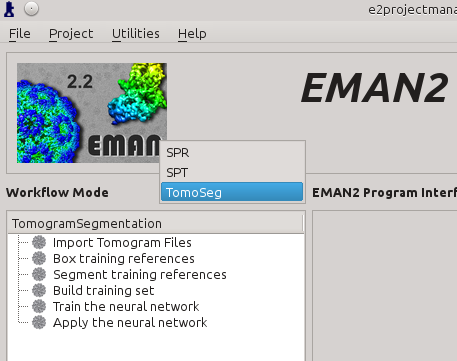
Click the Workflow Mode drop-down menu next to navigate to the TomoSeg panel.
Import Tomograms
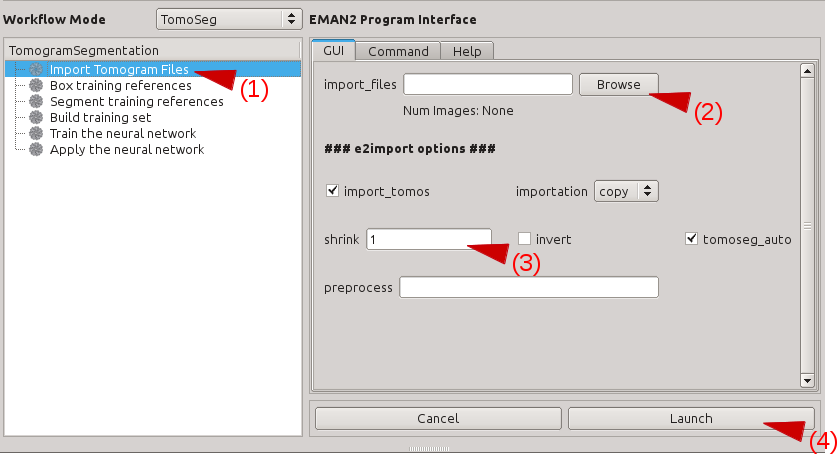
Click Import Tomogram Files on the left panel (1). On the panel showed up on the right, click Browse next to import_files (2), and select the tomogram you would like to segment in the browser window, and click Ok. If you want to bin the tomogram before processing, write the shrinking factor in the text box next to shrink (3). Make sure that the import_tomos and tomoseg_auto box is checked. Finally, click Launch (4) and wait the pre-process to finish.
Select Positive Samples
Open Box training references. Press browse, and select your imported tomogram. Leave boxsize at -1, and press Launch.
In a moment, three windows will appear on your screen, which will be familiar if you’ve boxed particles before. The only difference between this boxing and the other is that you can box in 2D on slices of a 3D image.
On the window named e2boxer, make sure your box size is 64. None of the other options need to be changed.
On the window containing your tomogram, you can begin selecting boxes. Go up and down in the tomogram using the arrow keys, select and drag boxes using the left mouse button, and delete boxes using Shift + left mouse button. As you select boxes, they will appear in the (Particles) window.
Select around 10 boxes containing your structure. If your structure appears differently throughout the cell (e.g. microtubules), be sure to include a variety of views in the boxes.
When selecting boxes, ensure that your structure is clear in the (Particles) window. You will have to manually segment these boxes, so if you can’t see your structure, your segmentation will be more difficult, and your final segmentation will suffer as a result. It is better to have fewer boxes that you can segment better than more boxes you segment worse.
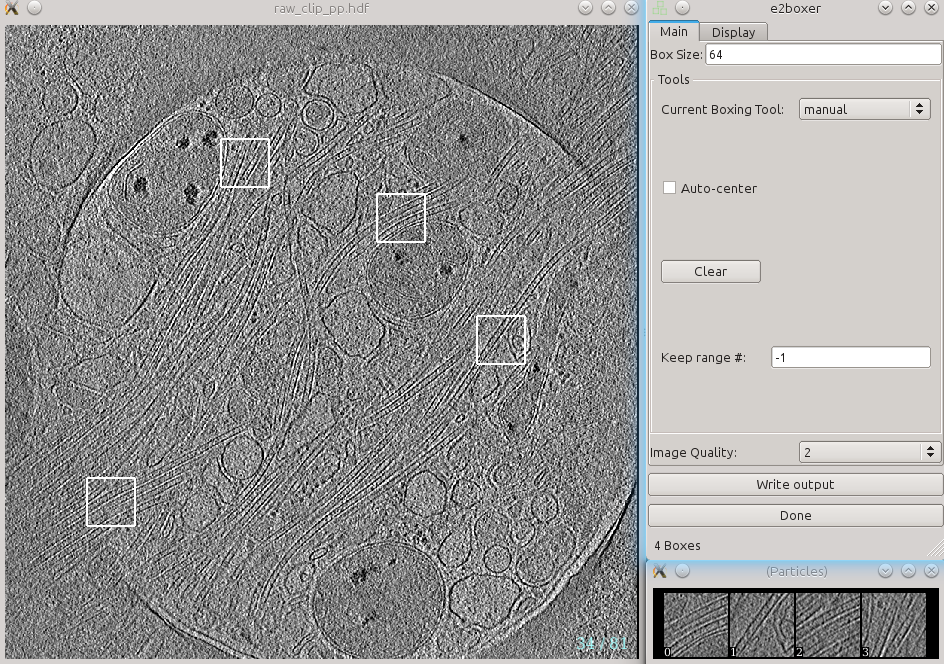
After getting an appropriate number of boxes, press Write output in the e2boxer window.
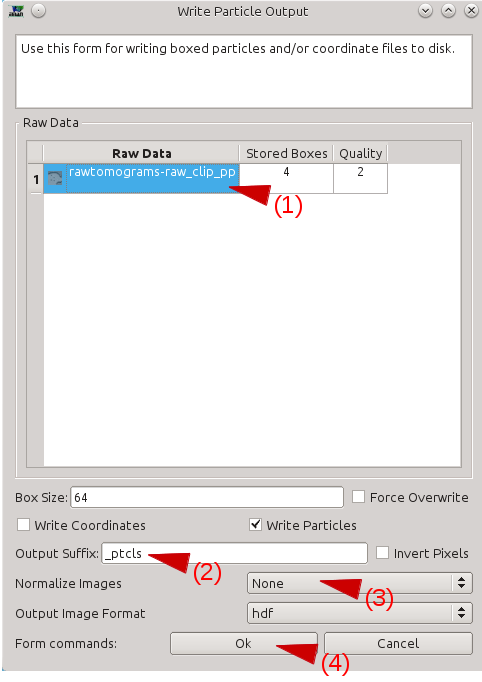
Select your boxes in the Raw Data window.
Write the suffix of the particles in the Output Suffix text box.
In Normalize Images, select None.
Press OK.
Manually Annotate Samples
In order to train the program to recognize your structure, you have to segment the boxes that you selected.
Navigate to the Segment training references interface in the EMAN2 window. For Particles, browse and select the "_ptcls" file you just generated.
Leave Output blank and keep segment checked, and press Launch.
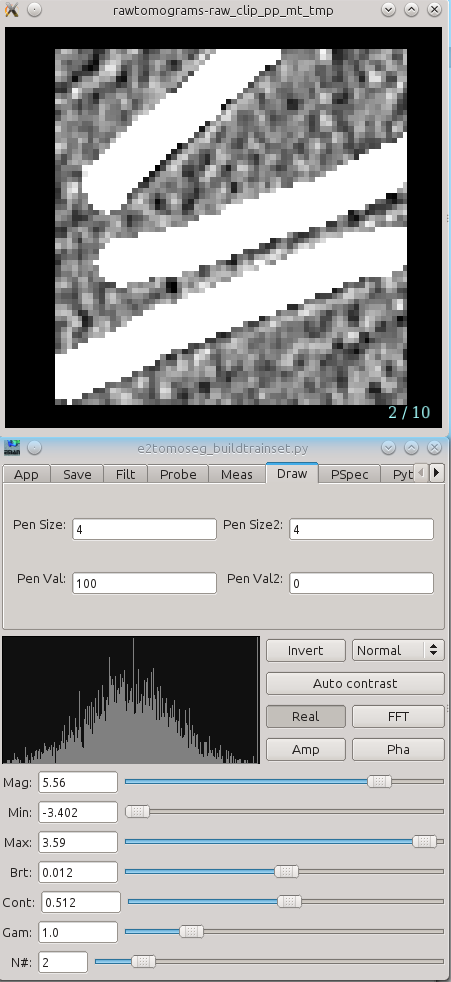
Two windows will appear, one small and one large. The smaller will contain your boxes, which you can navigate through with your arrow keys or zoom in and out of with your scroll wheel. The larger will open on the Draw tab. Using your cursor, draw on the structures in your boxes. You can go back to the boxing window and check the surrounding of the region for better segmentation.
Segment all of your boxes. If you need to change the size of the pen, change both Pen Size and Pen Size2 to a larger or smaller number. Try not to select too much of the space outside of your structure, so definitely shrink the pen size if it is too big.
When you are finished, simply close the windows. The segmentation file will be saved automatically as "*_seg.hdf" under the same file name of your particles.
Select Negative Samples
Go back to the boxing windows, find and press the Clear button on the e2boxer window. This deletes your previous selections, so make sure the output is written before doing this.
Now, in the tomogram window, select boxes that DON’T contain your particle. You can select as many of these as you like (normally ~100). Try to get a wide variety of other cellular structures, empty space, gold fiducials and high-contrast carbon.
After finishing picking the negative samples, write the particle output following the same way you generate the positive samples. Make sure to set a different suffix in the Output Suffix box, like "_bad".
Build Training Set
Find the Build training set option in EMAN2.
In particles_raw, select your "_ptcls" file.
In particles_label, select your "_ptcls_seg" file.
In boxes_negative, select your "_bad" file.
Leave trainset_output blank. Ncopy controls the number of particles in your training set. The default of 10 is fine, unless you want to do a faster run at the expense of accuracy.
Press Launch. The program will print "Done" in your Terminal when it has finished. The training set will be saved as the same name as the positive particles with "_trainset" suffix.
Train Neural Network
Open up Train the neural network in EMAN2. In trainset, browse and choose your "_trainset" file.
The defaults for everything else in this window are sufficient to produce good results. To significantly shorten the length of the training (and potentially reduce the quality), reduce the number of iterations. Write the filename of the trained neural network output in the netout text box, and leave the "from_trained" box empty if it is the first training process.
Press Launch. The program will print a few numbers quickly at the beginning (this is to monitor the training process. Something is wrong if it prints really huge values), and then will notify you once it's completed each iteration. When it's finished, it will output the trained neural network in the specified netout file and samples of the training result in a file called "trainout_" followed by the netout file name.
After the training is finished, it is recommended to have a look at the training result before proceeding. Open the "trainout_*.hdf" file from the e2display window (use show stack), and you should see something like this.
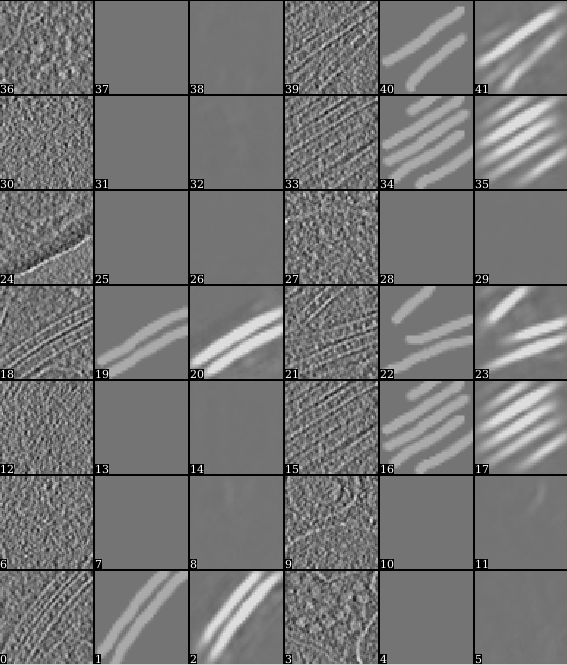
Zoom in or out a bit so there are 3*N images displayed in each row. For each three images, the first one is the training sample you picked from the tomogram, the second is its corresponding segmentation, and the third is the neural network output using the first one as input. The neural network is considered well trained if the third image matches the second image. For the negative particles, both the second and the third images should be blank.
If the training result looks somewhat wrong, go back and check your positive and negative training set first. Most significant errors are caused by wrong training set, i.e. having some positive particles in the negative training set, or one of the positive training set is not correctly segmented. If the training result looks suboptimal (the segmentation is not clear enough but not totally wrong), you may consider continue the training for a few round. To do this, go back to the Train the neural network panel, choose the previously trained network for the from_trained box and launch the training again. It is usually better to set a smaller learning rate in the continued training. Consider change value in the learnrate to ~0.001, or the print out learning rate value at the last iteration of the previous training.
If you are satisfied with the result, go to the next step to segment the whole tomogram.
Apply to Tomograms
Finally, open Apply the neural network panel. Choose the tomogram you used to generate the boxes in the tomograms box, choose the saved neural network file (not the "trainout_" file, which is only used for visualization), and set the output filename. You can change the number of threads to use by adjusting the thread option. Keep in mind that using more threads will consume more memory as the tomogram slices are read in at the same time. When this process finishes, you can open the output file in your favourite visualization software to view the segmentation.
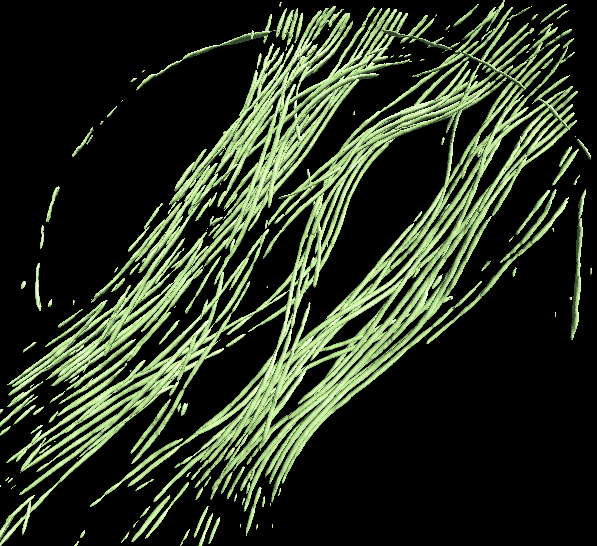
To segment another different feature, just repeat the process using a different training set. Make sure to use different file names. To segment the same feature on other similar tomograms, import those tomograms in the same way, skip the boxing and training process, and simply apply the saved neural network on the imported tomogram.
Tips in selecting training samples
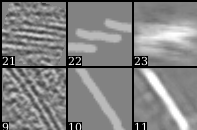
- Annotate samples correctly, as a bad segmentation in the training set can damage the overall performance. In the microtubule case, if you annotate the spacing between microtubules, instead of the microtubules themselves (it is actually quite easy to make such mistake when annotating microtubule bundles), the neural network can behave unpredictably and sometimes just refuse to segment anything. Here is the training result on an incorrect and correct segmentation in one training set. Note the top one (22) is annotating the space between microtubles.
- Make sure there are no positive samples in the negative training set. If your target feature is everywhere and it is hard to box negative regions, you can use some more positive samples that contains various other features beside the target feature.
- You can bin your tomogram differently to segment different features. Just import multiple copies of raw tomogram with different shrink factor, and unbin the segmentation using math.fft.resample processor. It is particularly useful when you have feature of various scale in one tomogram, and cannot have the large ones fit into the 64*64 box and small ones visible at the same scale.
- In some cases, there is a significant missing wedge in the x-y plane slices (you can visualize this by clicking Amp button when looking at the slices in EMAN2). So the resolvability on x direction is different than that on y direction. It is important to provide features running in different directions in the training set, otherwise the neural net may only pick up features in one direction based on the Fourier patten. Also, you may want to check the stage of the microscope, since this may suggest the sample is not tilted exactly around the x axis.
- It is also vital to cover various state of the target feature. For example, if you want to segment single layer membranes, you may want to have some cell membrane, some small vesicles, and some vesicles with darker density inside, so the neural network can grab the concept of membrane. Just imagine how you would teach someone with no biological knowledge about the features you are looking for. On the other hand, it is possible to ask the neural network to separate different type of those features. In the membrane example, it is possible to train the neural network to segment vesicles from cell membranes based on the curvature, or recognize dense vesicles based on the difference of intensity on both side of the membrane, given carefully picked training set.
Acknowledgement
Darius Jonasch, the first user of the tomogram segmentation protocol, provided many useful advices to make the workflow user-friendly. He also wrote a tutorial of the earlier version of the protocol, on which this tutorial is based.
