Getting Started with an Arduino

Note that Arduinos may be somewhat static sensitive. If you are wearing a sweater or jacket that tends to produce a lot of static, Please remove it, and ground yourself before touching the electronics
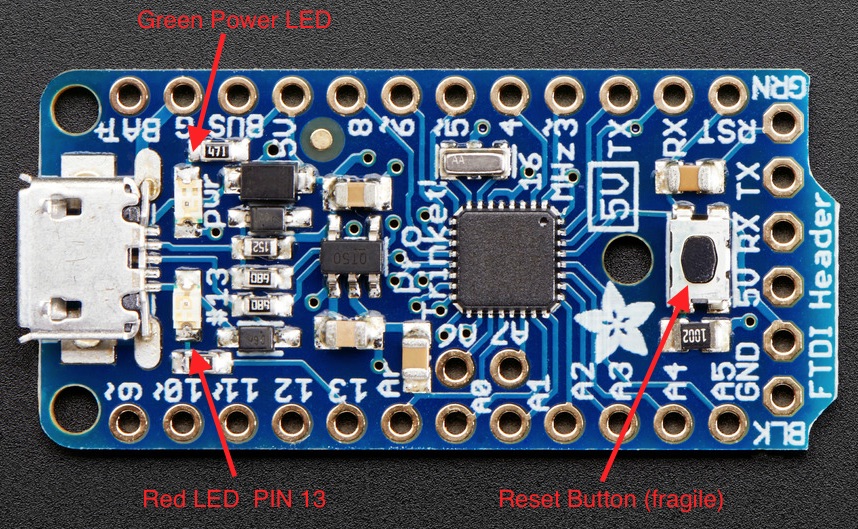
Different Arduinos will have different physical configurations, but all will have a USB connector of some sort. This connector serves two purposes.
- When plugged into a computer, it allows you to upload a program to the Arduino (it also provides power for testing)
- When plugged into a USB power supply, it provides power for the Arduino to run its program
When you have your Arduino plugged into your computer, it may seem like it is just acting as an interface between your computer and the devices attached to it. This is NOT the case. The Arduino is a standalone computer. Once it is programmed, any time it is provided with power it will complete whatever its programmed activity is. Once you have your Arduino programmed, you are welcome to come up to the front and plug it in to one of my USB power supplies and demonstrate to yourself that it doesn't need a computer.
The Arduino IDE
There is a free Integrated Development Environment (IDE) for the Arduino platform. Most of the Arduinos we will be using in lab are a special inexpensive ($10) version made by AdaFruit, called a "Pro Trinket". There is a special version of the IDE for this Arduino. We will also be working with NeoPixels, so you should have the NeoPixel library installed as well. If you didn't do either of these things before class, here are the links:
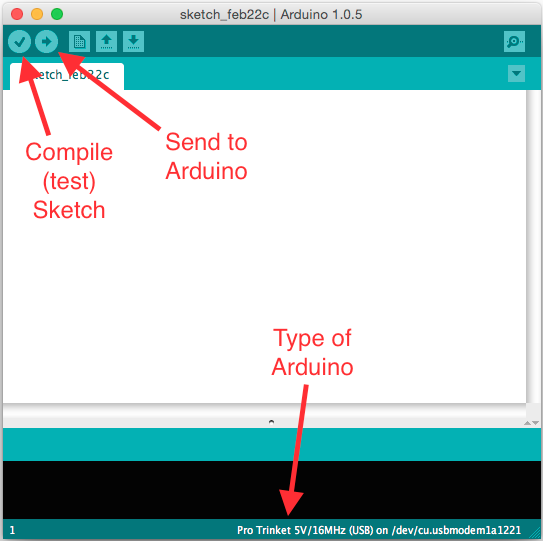
Once you have it installed, launch the IDE. You should see something like this:

This is the window where you will write your Arduino programs, called "Sketches".
Selecting a Device
Before you can send a program to the Arduino, you need to tell the IDE what sort of Arduino you are connecting.
If you are doing the simple NeoPixel demonstration or the Star Lord Mask, you are using an Pro Trinket:
On the Tools->Board menu, select Pro Trinket 5V (USB)
On the Tools->Programmer menu, select USBtinyISP
This type of Arduino will only accept new programs for ~5 seconds after starting. You can press the reset button to gain another 5 seconds. If your laptop is slow and compiling scripts is slow, you may need to press reset sometime a few seconds after pressing the -> button
If you are doing the Huey the Chameleon or NeoPixel Matrix demo, you are using an Arduino Micro:
On the Tools->Board menu, select Arduino Micro
On the Tools->Programmer menu, select AVRISP mkII
You may (depending on your machine) need to select a USB port appearing on Tools->Serial Port
- This type of arduino can be programmed at any time. It does not need to be reset before it will take a program.
On Windows machines, you may need to do some extra work to get the USB driver properly installed. Try going through the rest of the demo. If you get connection errors when trying to upload the code, first make sure you have reset the Arduino at the appropriate time (if necessary). If that doesn't fix it, check:
http://www.hobbyist.co.nz/?q=taxonomy/term/22 (note that we are NOT using FTDI)
Before you do anything else, on the Tools menu, find Board and (unless told otherwise) select Pro Trinket 5V (USB). This will tell the IDE what specific type of Arduino it should compile code for. Also under Tools->Programmer select USBtinyISP
Python vs. C
The Arduino, unfortunately, is not programmed in Python. Instead, it is programmed in a simple variant of the C programming language. Don't worry, the sorts of programs we will be dealing with here are quite simple, and all you should have to learn are a few simple syntax changes. For those who don't know any C, this should show you that the Python skills you've learned are more portable than you may have thought :
In python you normally have one line of code on each line. In C each statement must be followed by ;, and you can have as many on a line as you like.
In C, you must declare variables before you can use them, using statements like int var1,var2; or float mynumber;.
Common data types are: char (8 bit), short (16 bit), int (32 bit), float (single prec). You may precede integer types with unsigned.
In C, you can declare an array of a particular type like: int var3[128];
In python, blocks of code are defined by indented lines following a :. In C, it doesn't matter how you indent. The block of code starts with { and ends with }
The for statement works differently in C than in Python. Stick with while which works the same in both.
The #include statement in C is similar to import in Python. It gives access to specific libraries.
When you define a function, instead of def you put the type of value the function returns, like int. If you don't return anything you say void.
Here is a simple program written in Python, then in C, for comparison :
# sum all of the integers from 1 to 10 in a stupid way
i=0
total=0
while i<=10:
  i+=1
  total+=i

print total
/* sum all of the integers from 1 to 10 in a stupid way */
#include <stdio.h>   // get access to the printf statement
int i=0;
int total=0;

while (i<=10) {
i++; total+=i;
}

printf("%d\n",total);
Your First Arduino Sketch
Happily, the Arduino IDE includes a large number of example programs built-in. We need to make sure your computer can actually speak to the Arduino, and upload a program.
In the IDE, on the File menu, select Examples -> 01.Basics -> Blink
- This will open a new window with a simple program which will cause the built in LED on the Arduino (not the big one attached by a wire) blink once a second.
- Read through this program and try to understand it
- Every Arduino sketch has at least 2 functions defined:
void setup() which gets called once when the Arduino starts up
void loop() which gets called over and over again forever until you turn the power off.
- Every Arduino sketch has at least 2 functions defined:
- Press the checkmark button in the upper right corner of the window. This will make sure there are no syntax errors in the sketch.
Plug the Arduino in to the computer USB port. Note that Trinket Arduinos will only wait ~3-5 seconds after being plugged in before they start running their program. You have to press the -> button to upload the sketch within this time window.
- If you miss it, there is a tiny reset button on the arduino. You can press it (carefully) and this will give you another 3-5 seconds to upload.
- Make sure the built in LED on the Arduino blinks like a heartbeat after you upload.
- If you like, you can unplug the Arduino and bring it to the front of the class where I have a USB power supply and verify that it blinks by itself, without a computer to plug it into (you don't have to if you believe me already).
Before giving the Arduino to the next person, you should 'de-program' it, by loading the BareMinimum demo sketch and loading that to the Arduino the same way you just loaded the Blink sketch.
Ok, you're done with the basic intro. Return to the Main Page
